Upgrading your home with a fresh look often starts right under your feet. Many homeowners feel nervous about installing floor tiles, but it is actually a rewarding project you can do yourself. Think of it like a giant puzzle that makes your room look brand new. Whether you are fixing up a small bathroom or a large kitchen, the process requires patience and the right steps. I remember my first time tiling; I was worried about things being crooked, but with a good plan, everything snapped into place. This guide will walk you through the entire journey so you can feel proud of your beautiful new floor.
Understanding Your Tile Options
Before you begin installing floor tiles, you need to pick the right material for your space. Ceramic tiles are very popular because they are easy to cut and come in many colors. Porcelain is another great choice because it is very tough and resists water well. If you want a more natural look, you might consider stone like marble or slate. Each type of tile has a different “feel” and level of durability. Think about how much foot traffic the room gets. A busy hallway needs a strong tile, while a guest bathroom can use something more decorative. Picking the right tile early saves you from headaches later.
Essential Tools for the Job
Having the right tools makes installing floor tiles much easier and faster. You will need a notched trowel to spread the sticky mortar on the floor. A manual tile cutter or a wet saw is necessary for making straight and clean cuts. Do not forget plastic spacers; these tiny crosses keep the gaps between your tiles perfectly even. You also need a rubber mallet to gently tap the tiles into place without breaking them. A level is vital to make sure your floor isn’t bumpy. Gathering all these items before you start prevents you from having to run to the store in the middle of the mess.
Preparing the Subfloor Correctly
A great tile job depends on what is underneath. When installing floor tiles, your subfloor must be clean, dry, and very flat. If the floor is bumpy, your tiles might crack later on. Many pros use a cement backer board to create a steady surface. You should sweep away all dust and fix any holes in the wood or concrete first. If you are working on a concrete slab, check for cracks that might move. Using a leveling compound can help fill in low spots. Taking the time to prep the floor is the secret to a professional-looking finish that lasts for many years.
Measuring and Layout Planning
You never want to start installing floor tiles in a corner without measuring first. If you do, you might end up with tiny, ugly slivers of tile at the other wall. Find the center of the room by measuring the walls and snapping chalk lines. Lay out your tiles without any glue first to see how they fit. This “dry fit” helps you decide where the cuts will go. You want the most visible areas to have full-sized tiles. Adjusting your starting point by just an inch can make the whole room look much more balanced and professional.
Mixing and Applying Thin-set Mortar
Thin-set is the “glue” that holds everything together when installing floor tiles. It usually comes as a powder that you mix with water until it looks like peanut butter. Use a bucket and a mixing paddle to get it smooth without any dry lumps. Only mix a small amount at a time so it does not dry out before you use it. When you spread it on the floor, use the notched side of your trowel to create ridges. These ridges help the tile grip the floor firmly. Applying the right amount of mortar ensures your tiles stay stuck for a long time.
Setting the First Tile
The first tile is the most important part of installing floor tiles. Place it carefully at the center mark you made earlier. Press it down firmly into the mortar and give it a little twist to settle it. Use your level to make sure it is perfectly flat. This first tile acts as the guide for every other piece in the room. If it is tilted, the rest of the floor will look off. Take a deep breath and take your time here. Once that first piece is perfect, you will feel much more confident as you move across the room.
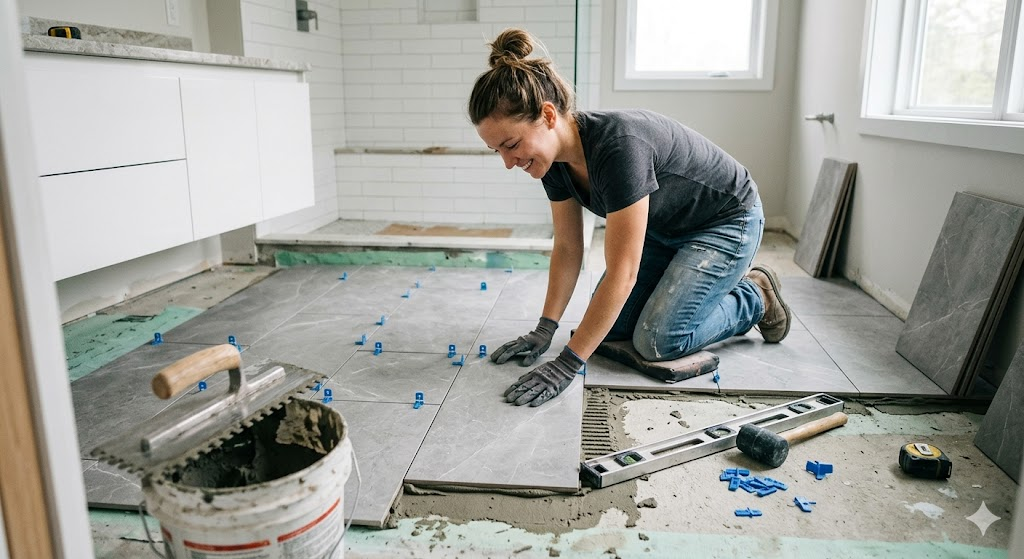
Using Spacers for Perfect Lines
Spacers are your best friends when installing floor tiles. These small plastic pieces ensure that every gap for the grout is exactly the same width. Without them, your lines will eventually start to look wavy or crooked. Place a spacer at every corner where tiles meet. As you work, keep an eye on the lines to make sure they stay straight across the long side of the room. It is much easier to fix a slightly moved tile now than it is after the mortar has dried hard. Consistent gaps make the final floor look like it was done by a master.
How to Cut Tiles Safely
Eventually, you will reach a wall or a corner where a full tile won’t fit. This is a normal part of installing floor tiles. Measure the space carefully, remembering to leave room for a spacer. Mark the tile with a pencil and use your cutter to snap it to size. If you need to go around a pipe, you might need a tile nipper or a special hole saw bit. Always wear safety glasses when cutting, as small bits of ceramic can fly up. Cutting takes a bit of practice, so do not worry if you break a piece at first.
Tapping Tiles with a Rubber Mallet
After setting a tile into the mortar, it needs a gentle nudge to stay put. When installing floor tiles, use a rubber mallet to tap the surface lightly. This removes air bubbles trapped underneath and ensures the tile is fully bonded to the floor. Check your level frequently to see if one corner is higher than the others. If a tile sinks too low, pull it up, add a little more mortar, and reset it. The goal is a smooth surface where you won’t trip on any edges. This step makes the floor feel solid when you walk on it later.
Cleaning Up Excess Mortar
While you are installing floor tiles, mortar might squeeze up through the gaps. It is very important to wipe this away with a damp sponge before it dries. If the mortar hardens in the gaps, there won’t be enough room for the grout. Also, make sure the surface of the tiles is clean. Once thin-set dries on top of a decorative tile, it can be very hard to remove without scratching the finish. Keep a bucket of clean water nearby and stay tidy as you go. A clean workspace leads to a much better final result.
Grouting the Joints
Once the mortar has dried for 24 hours, it is time for the final touch. Grout fills the spaces between the pieces you placed while installing floor tiles. Mix the grout and use a rubber float to push it deep into the cracks at a 45-degree angle. Let it sit for about ten to fifteen minutes, then wipe the tiles with a barely damp sponge. You will see a hazy film form, which you can buff off with a dry cloth later. Grout comes in many colors, so choose one that matches or contrasts nicely with your tile.
Project Summary Table
| Step | Task Name | Key Tools Needed | Time Estimate |
| 1 | Prep Subfloor | Broom, Level, Backer Board | 2–4 Hours |
| 2 | Layout | Tape Measure, Chalk Line | 1–2 Hours |
| 3 | Spreading Mortar | Notched Trowel, Thin-set | Ongoing |
| 4 | Setting Tiles | Spacers, Rubber Mallet | 4–8 Hours |
| 5 | Cutting | Wet Saw or Manual Cutter | As Needed |
| 6 | Grouting | Grout Float, Sponge, Bucket | 3–5 Hours |
Frequently Asked Questions
1. How long does it take to walk on a new tile floor?
Typically, you should wait at least 24 hours for the mortar to set before walking on it. If you walk on it too soon, the tiles might shift or become unlevel. After grouting, wait another 24 hours before moving heavy furniture back.
2. Can I install new tile over old tile?
Yes, but the old tile must be very firm and not cracked. You will need to scuff up the surface of the old tile so the new mortar can stick to it. However, it is usually better to remove the old floor for the best results.
3. What is the difference between sanded and unsanded grout?
Sanded grout is stronger and used for gaps wider than 1/8 inch. Unsanded grout is smoother and used for very thin gaps or delicate tiles that might get scratched by sand.
4. How do I know which trowel size to use?
Larger tiles usually need a trowel with bigger notches to hold more mortar. A common size for floor tiles is 1/4 inch by 3/8 inch, but check the tile box for the manufacturer’s advice.
5. Do I need to seal my tile floor?
Most ceramic and porcelain tiles do not need sealer, but the grout lines often do. Sealing the grout helps prevent stains from spills and makes cleaning much easier in the future.
6. What if I make a mistake while the mortar is wet?
The great thing about tile is that you can move it while the mortar is still wet. If a tile looks crooked, simply lift it up, fix the mortar, and put it back down correctly.
Conclusion
By following these steps, installing floor tiles becomes a manageable and exciting DIY project. You have learned how to prep the floor, layout your pattern, and finish with grout. It takes a little elbow grease, but the result is a durable and stylish floor that can last for decades. Every time you walk into the room, you will remember the hard work you put in. Don’t be afraid to take your time and ask for help if you need it. Ready to start? Grab your trowel and transform your home today! Feel free to share your progress or ask any questions in the com